Tuff Trac® TPO PSA Installation Instructions
The Conventional Roll Method
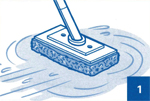 Clean the TPO roof membrane surface where the walkway is going to be installed with an approved cleaner and a scotch brite pad. After the intended walkway area is clean of debris, allow cleaner to dry, then apply primer to the TPO membrane. Make sure the primer is completely dry before trial positioning of the roof walkway.
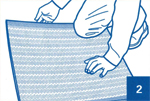
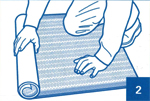 Start by unrolling a 1-2 foot piece of Tuff Trac® PSA roof walkway, leaving the release liner in place. Align the Tuff Trac® PSA roof walkway and roll in the intended direction of the walkway application.
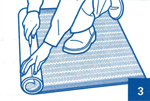 Carefully cut the release liner on top of the roll in the cross direction, being careful not to cut the Tuff Trac® PSA roof walkway.
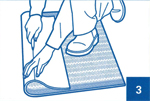
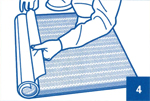 Peel back about 6 inches of the release liner in the opposite direction of the intended walkway application, exposing the back side adhesive.
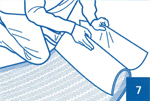
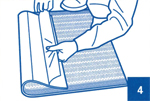
 Hold the release liner with one hand and pull the roll along the roof deck with the release liner, leaving the applied roof walkway behind.
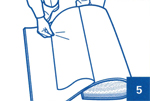
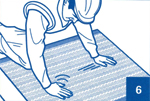 Stop frequently to press the roof walkway in place with heavy hand pressure, smoothing the Tuff Trac® PSA roof walkway towards the outer edge.
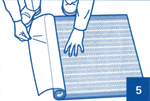
 When finished with a maximum 10' section, cut the roll and go back and remove the remaining release liner from the start up section and smooth to the edge. Caution: If Tuff Trac® PSA is going to be applied over field seams, cut material to allow a 4 inch gap over field seams for future access.
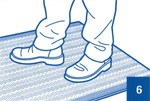
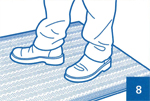 Walk over the entire surface to make sure the Tuff Trac® PSA roof walkway is adhered completely to the roof membrane surface.
The Walkway Pad Method
 Clean the TPO roof membrane surface where the walkway is going to be installed with an approved cleaner and a scotch brite pad. After the intended walkway area is clean of debris, allow cleaner to dry, then apply primer to the TPO membrane. Make sure the primer is completely dry before trial positioning of the roof walkway.
 Align the Tuff Trac® PSA roof walkway pad in the intended direction of the walkway application, leaving the release liner in place.
 Pull back one end of the Tuff Trac® PSA roof walkway pad and carefully cut the release liner approximately 12 inches from the end in the cross direction, being careful not to cut the Tuff Trac® PSA roof walkway pad.
 Peel back the smaller section of the release liner in the opposite direction of the intended walkway pad application, exposing the back side adhesive. Affix exposed adhesive side to the TPO roof membrane.
 Pull back the pad to expose the remaining release liner and pull on the release liner in the direction of the intended pad application, at the same time pressing on the Tuff Trac® PSA walkway pad to adhere to the TPO roof membrane leaving the applied roof walkway pad behind.
 Walk over the entire walkway surface to make sure the Tuff Trac® PSA roof walkway is adhered completely to the roof membrane surface.
Cautions and Warnings:
- Tuff Trac® PSA must be stored in a dry area and away from direct sun exposure.
- Some primers develop condensation when the ambient temperature is near a dew point. If condensation develops, discontinue the installation of Tuff Trac® PSA walkway since proper adhesion will not be achieved. Allow area to dry and reapply the approved primer to the previously coated area and confirm that no condensation is occurring and if so, continue with Tuff Trac® PSA installation.
- Storage and use of Tuff Trac® PSA at temperatures below 40°F (4°C) may result in loss of tack, and in extreme cases, will result in no adhesion of Tuff Trac® PSA.
- Prolonged job site storage of Tuff Trac® PSA at temperatures in excess of 90°F (32°C) may affect product shelf life.
- Shelf life of Tuff Trac® PSA is 12 months based upon recommended storage temperatures.
Return to Tuff Trac® TPO PSA Product Page